
Plant it Forward
Feb 01, 2013 05:18AM ● By Style
Spring is almost upon us, which means it’s time to get outside and in the garden! However, gardening isn’t just for adults – there are lots of lessons kids can learn from getting their hands dirty too.
LESSONS LEARNED
Petsy Proett, teacher and school garden coordinator at Maria Montessori Charter Academy in Rocklin, says her school’s 10,000-square-foot garden, which is tended by students in preschool through eighth grade, gives kids a great sense of satisfaction to set goals, work toward them, and then reap the benefits as they harvest what they’ve grown.
Amber Siglar, nursery assistant at Bushnell Gardens Nursery & Supply Shoppe in Granite Bay who also volunteers at her daughter’s school garden, says there’s a number of educational lessons kids can glean in the garden, from younger kids exploring worms to older ones learning about composting. “It’s really great to just dig in the soil, and just being out in the garden is good – they’re going to be learning,” she adds.
Judy Chance, principal of Lakeview Elementary in El Dorado Hills – which has a school garden consisting of six garden boxes that’s cultivated by students in junior kindergarten through fifth grade – finds students discover how their food grows and the possibilities for what they can do with it. “We saw a big change in what the children asked to eat,” she explains. “I’ve had children say, ‘I don’t have a snack today, can I go get some tomatoes?’”
WHAT TO PLANT
So which plants are the best to grow when gardening with kids? Siglar says little ones love vegetables (think peas and cherry tomatoes) that they can pick right off the vine and eat. “Also strawberries. They’re low to the ground, easy to find and bright red,” she says.
Proett says root vegetables, like carrots and turnips, can be fun since harvesting becomes a “treasure hunt.” “You pull them up and it’s a big surprise what it’s going to look like,” she says. She also suggests growing vegetables like peas or tomatoes where one plant produces a lot of fruit. “[It’s] nice because you can keep picking off of [the plant] and it keeps producing more, rather than the plant being done once it’s picked,” she says.
GET GROWING
Do you want to start a garden with your child, but have limited space? According to Siglar, you’re not out of luck. All you really need is a small planter box or pot containers to start, she says. “A larger space may be harder to manage if you really want to get the children involved, because you’re going to be doing the majority of the work, so a smaller space that’s designated just as the children’s garden is a great idea,” she explains.
And what if you feel your thumbs are more black than green? No worries, Proett says. She encourages everyone to give gardening a try. “The wonderful thing is if you just give a plant the basics – some soil, water and light – it’s going to grow,” she says. “The light that comes into kids’ eyes when they watch what they planted grow and they can harvest it is pretty fantastic.”
KID FRIENDLY RECIPIES
All recipes from At the Farmers’ Market with Kids: Recipes and Projects for Little Hands by Ethel Brennan and Leslie Jonath
(Chronicle Books, 2012, $22.95)
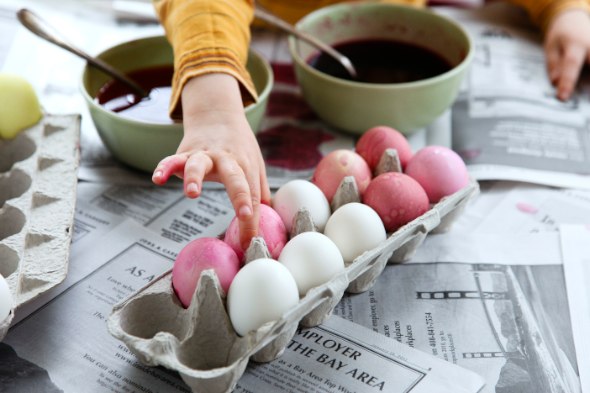
Easter Eggs Dyed with Beets and Onion Skins
Although dyes for Easter eggs are always available in stores, natural dyes are easy to make using beets and onions of different colors. White eggs turn brighter colors than brown eggs, which take on muted tones. The eggs can be cooked up to 3 days ahead and stored in their cartons in the refrigerator. Beet dyes work best when hot, so parent supervision is important.
Makes 18 dyed eggs
Kids Can: Grate the beets; dip the eggs in the dye; soak the onion skins and wrap around the eggs; unfurl the skins after eggs are cooked.
For beet-dyed eggs:
- 12 eggs
- 6 medium red beets
- 2 tablespoons white vinegar
- Cheesecloth
- 6 medium yellow beets
- 1 tablespoon ground turmeric
For onion skin-dyed eggs:
- Skins of 12 to 14 onions, both red and yellow
- 6 pieces of fabric, preferably nylon pantyhose, each about 8 inches square
- 6 eggs
- 20 to 30 rubber bands
To beet-dye the eggs. Place the eggs in a large pot. Add enough cold water to cover the eggs. Bring to a boil over high heat, then turn off the heat. Let the eggs stand in the hot water for 20 minutes. Remove the eggs from the water and pat them dry.
To dye the eggs red, trim the stems and root ends from the red beets. Grate the beets on a box grater. They do not need to be peeled. Place the grated beets in a pot and add 3 cups water. Bring to a boil over high heat, reduce the heat to medium, and cook for 30 minutes. Stir in the vinegar and strain through a colander lined with cheesecloth. Discard the grated beets. Pour the beet dye into a small glass or ceramic bowl; you should have about 1 cup. Gently add 2 eggs at a time to the dye and let stand for 10 to 15 minutes. The dye works best when hot, so reheat it as needed.
To dye the eggs yellow, trim the stem and root ends from the yellow beets. The skins of yellow beets have a greenish tint that can muddy the color, so unlike red beets they need to be peeled. Grate the peeled beets on a box grater. Place the grated beets in a pot and add 3 cups water and the turmeric. Follow the same method as for the red beets, reheating the dye as needed.
To onion skin-dye the eggs: Fill a large bowl with water and put the onion skins in the water. Let the skins soften in the water for about 10 minutes. One by one, put the fabric squares in the water. Squeeze out the squares until they are just moistened. Wrap 4 or 5 onion skins around each egg to cover it completely. Place the egg in the middle of a fabric square. Bring up the corners of the fabric and wrap the fabric snugly around the egg so that the onion skins press tightly against the egg. Wrap rubber bands around the fabric to hold it in place.
Put the wrapped eggs in a pot. Pour in enough cold water to cover the eggs. Bring to a boil over high heat. Boil the eggs for 6 to 7 minutes. Drain the water from the pot and run cold water into the pot to cool the eggs. Carefully remove the rubber bands and then the fabric from the eggs. Peel off the onion skins. The eggshells will have absorbed the swirling pattern of the onion skins. Let the eggs dry.
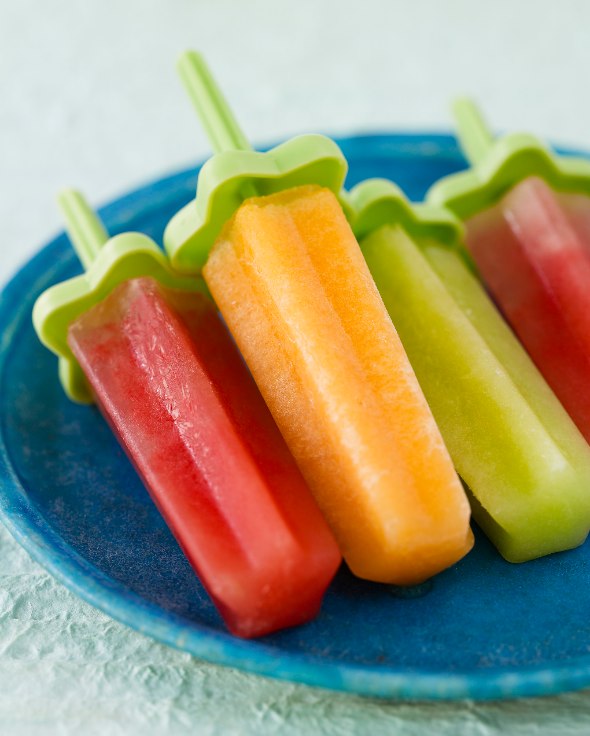
Melon Medley Paletas
Paletas are traditional Mexican ice pops, usually made from puréed summer fruits. Melons are especially good for pops because they are naturally high in water and sugar. This recipe calls for watermelon, cantaloupe, and honeydew, but you can experiment with the types of melon available at your market. If you don’t have molds, you can use large ice-cube trays or paper cups and wooden ice-pop sticks. The yield is approximate and depends on the size of your melons and your molds. If you have too much fruit puree for the number of molds, you can combine the extra with ice in a blender and make refreshing fruit drinks, called aguas frescas, to enjoy before the pops are ready.
Makes about 12 paletas
Kids Can: Scoop the seeds from the melons; remove the melon flesh with an ice-cream scoop; place the melon in the blender and make the puree; help fill the molds.
- 1 small seedless watermelon
- 1 small cantaloupe
- 1 small honeydew melon
Cut each melon in half. With a spoon, scoop out the seeds from the cantaloupe and honeydew. Then scoop out the flesh from all the melons with an ice-cream scoop. Or you can cut the flesh from the rind with a knife, then cut it into chunks.
Have ready 12 ice-pop molds. You may want to have more on hand in case you end up with extra purée.
Put the watermelon in a blender and process until smooth. Fill one-third of the molds with the purée. Rinse out the blender and repeat with the cantaloupe and then with the honeydew. The purée can be a bit chunky.
Place the molds in the freezer. If you are using nontraditional molds, such as ice-cube trays or paper cups, you will need to freeze the purée until it is partially frozen, usually about 2 hours, then insert a stick into each mold and return the molds to the freezer.
Freeze the paletas for at least 8 hours or up to 24 hours. They will keep in the freezer for 1 week.
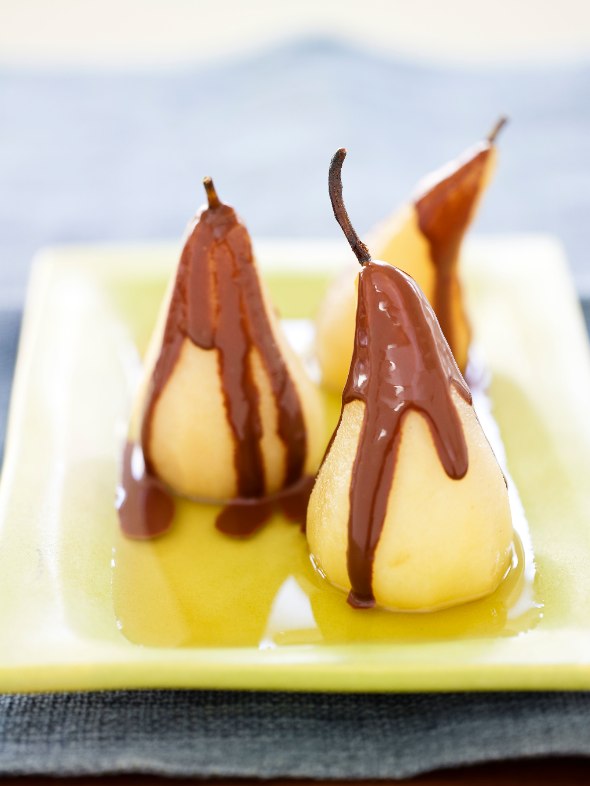
Poached Pears with Mexican Chocolate Sauce
The fragrant chocolate sauce, spiced with cinnamon and chile, pairs perfectly with the sweet, cooked pears in this dessert that appeals to both kids and adults. Arranging the poached pears is part of the fun of making the recipe. Each pear is served upright in a shallow bowl and accented with a scoop of ice cream, then both are drizzled with the chocolate sauce. Children will enjoy presenting their creations to everyone. When choosing pears, look for firm varieties like Bosc that will hold their shape when poached.
Kids Can: Rinse the pears; measure the ingredients for poaching the pears; test the pears for doneness; ladle the chocolate sauce for serving.
Serves 6
- 1 1/4 cups sugar
- 2 tablespoons balsamic vinegar
- 1 cinnamon stick, about 3 inches long
- 1/2 vanilla bean, split lengthwise, or 1 teaspoon pure vanilla extract
- Grated zest of 1 lemon
- 4 cups water
- 6 firm but ripe pears, with stems intact, peeled
For the chocolate sauce
- 4 ounces bittersweet chocolate, chopped
- 1/4 cup heavy cream
- 1/2 teaspoon ground cinnamon
- 1 teaspoon pure vanilla extract
- 1/4 teaspoon ancho chile powder
- 1 tablespoon sugar
- 1 pint vanilla ice cream
1. In a saucepan large enough to hold the pears, combine the sugar, vinegar, cinnamon stick, vanilla, and lemon zest. Pour in the water and bring to a boil over medium-high heat, stirring constantly until the sugar is dissolved and the spices are fragrant. Remove from the heat.
2. Trim about 1/4 inch off the base of each pear to create a flat bottom. Return the poaching liquid to a gentle boil. Using tongs, gently lower the pears into the liquid. Reduce the heat to simmer and poach the pears, uncovered, turning them occasionally with a wooden spoon so that they cook evenly. The pears are ready when they are easily pierced with a thin skewer. This will take 10 to 20 minutes, depending on the ripeness of the pears. Using a slotted spoon, remove the pears from the pot and place on a large plate. Discard the poaching liquid.
To make the chocolate sauce, combine the chocolate and cream in a heatproof bowl. Place the bowl over (but not touching) barely simmering water in a saucepan. Stir constantly until the chocolate is melted and the mixture is smooth. Add the cinnamon, vanilla, chile powder, and sugar. Continue to stir until the spices are well blended into the chocolate mixture. Remove from the heat.
Place the pears in shallow bowls. Add a scoop of ice cream to each bowl. Ladle a spoonful of warm chocolate sauce over the pear and another over the ice cream.